2. Installing the Operating System
This is a post of a series for setting up a Fileserver with ZFS and OpenIndiana. This post runs through setting up the operating system.
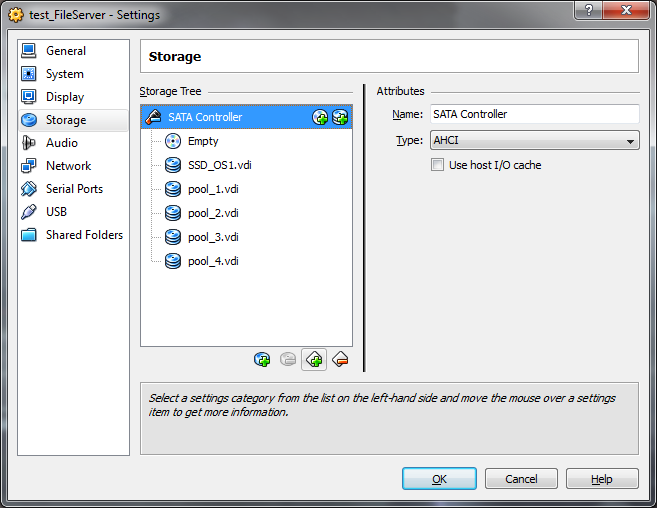
Installing OS and setup Network
For the following set of posts, I have chosen to use VirtualBox to run through how to use ZFS in building your FileSystem. The first step is downloading and installing OpenIndiana. Get the latest build from http://openindiana.org/download/ (at the time of writing, I’m using oi-dev-148-x86) and install it onto your system. In VirtualBox I chose to install onto a 64 bit Solaris setup. Make a hard disk when you’re setting up your VM image (I called mine OS_SSD1 because the HD is eventually going to be installed onto a solid state drive.) Now, the VM is booted, we can start having some fun (SSH into it and Away we go) Our first step is to setup the address for the box. I must admit, I’m pretty new to Solaris but from what I’ve found, we’ll run these commands to disable Auto Configuration via DHCP then enable our static config.
svcadm disable physical:nwam
svcadm enable physical:default
My fileserver is currently not on a domain (I’ll change this later), so I’ve added the line into my /etc/hosts file
10.12.1.1 thumper.local thumper
Put your hostname that you want to use (‘thumper’ for me) in /etc/nodename Your default gateway (routers) address should go in /etc/defaultrouter The last thing to do is tell the host about what subnet it’s on, For me, I added (for my server subnet)
10.12.1.0 255.255.255.0
The next step is set up your nameserver for DNS (/etc/resolv.conf) mine looks like this
nameserver 10.12.1.254
Copy /etc/nsswitch.dns to /etc/nsswitch.conf – so dns is used.
Now so the adaptor comes up on boot, find out the status of your network I/O by running
dladm show-link
(for me was e1000g0). Once you have this, you need to ‘plumbe” to set up the software in the kernel to set this interface on the TCP/IP stack.
ifconfig e100g0 plumb
echo 10.12.1.1/24 > /etc/hostname.e100g0
Last but not least for your network stack,
svcadm restart milestone/network
From this point on, that concludes the base setup with networking that I’m using for the FileServer. If this happened to be a critical server for you, perhaps you’d consider setting up redundant bootable drives with ZFS. It looks pretty cool.
Setting up the storage pool
Now we can get into the fun part. The first thing I want to do with this server is be able to store my data on it, so lets set up our storage pool. In my VM I’m using to test this I’ve added the disks I want to include in my pool (1GB disks for this test)
Once we’ve booted out VM (first thing I always do is ‘sudo bash’ because I’m evil in these silly little test environments). I want to find out the device ID’s for these hard disks I just added
root@thumper:~# iostat -En | egrep Size\|Soft
c1t0d0 Soft Errors: 0 Hard Errors: 6 Transport Errors: 0
Size: 0.00GB <0 bytes>
c1t1d0 Soft Errors: 0 Hard Errors: 0 Transport Errors: 0
Size: 17.18GB <17179869184 bytes>
c1t2d0 Soft Errors: 0 Hard Errors: 0 Transport Errors: 0
Size: 1.07GB <1073741824 bytes>
c1t3d0 Soft Errors: 0 Hard Errors: 0 Transport Errors: 0
Size: 1.07GB <1073741824 bytes>
c1t4d0 Soft Errors: 0 Hard Errors: 0 Transport Errors: 0
Size: 1.07GB <1073741824 bytes>
c1t5d0 Soft Errors: 0 Hard Errors: 0 Transport Errors: 0
Size: 1.07GB <1073741824 bytes>
As we can see, c1t0d0 is my CD-ROM drive, c1t1d0 is my hard disk, so I’ll want to create a Raidz-2 (two redundant drive) storage pool with the drives c1t2d0 c1t3d0 c1t4d0 c1t5d0
root@thumper:~# **zpool create datastore raidz2 c1t2d0 c1t3d0 c1t4d0 c1t5d0**root@thumper:~# zpool list
NAME SIZE ALLOC FREE CAP DEDUP HEALTH ALTROOT
**datastore 3.94G 256K 3.94G 0% 1.00x ONLINE** –
rpool 15.9G 4.17G 11.7G 26% 1.00x ONLINE –
root@thumper:~# zfs list
NAME USED AVAIL REFER MOUNTPOINT
**datastore 128K 1.93G 44.8K /datastore**rpool 4.52G 11.1G 45K /rpool
rpool/ROOT 3.61G 11.1G 31K legacy
rpool/ROOT/openindiana 3.61G 11.1G 3.58G /
rpool/dump 383M 11.1G 383M –
rpool/export 1002K 11.1G 32K /export
rpool/export/home 970K 11.1G 32K /export/home
rpool/export/home/scott 938K 11.1G 938K /export/home/scott
rpool/swap 544M 11.5G 187M –
We can see now we’ve created a pool of storage across our data (that’s zfs raided) that gives us double parity so we can loose two drives and still be running and we’ve got 2GB of usable space here (I’m using 1GB hard disks, in my real production box these will be 1TB disks). Other posts to come in the series:
- Selecting the hardware
- Installing the Operating System
- Setting up File systems & Snapshots
- Allowing access through NFS & SAMBA
- Setting up encrypted off-site backups
- Configuring Windows & Linux clients to dump backup info to the FileServer
- My router setup, configuring IP tables & torrents on a low-powered server.